Friday, 12 January 2018

OVERLAPPED CARDS

FRONT OF CARD
FRONT PANEL LIFTED
I don't know if there is an "official" name for this style of card, but it basically involves one larger card and one smaller, with the back panel of the smaller card attached to the inner part of the larger one so that the fold is just over the edge, hence you need to open the smaller card to access the inside of the larger one!  if that doesn't make sense, hopefully the pictures will make it clearer.

The front panel of the larger card has been decorated with a die-cut background and greeting (both cut from gold mirror card), whilst the smaller card has been covered with washi, and embellished with a diecut flourish and a wooden flower, coloured with layers of embossing powder and attached with a white split pin.

This style of card is great for "surprises" - for example, a gift card could be attached to the front, but hidden under the smaller card.

Friday, 5 January 2018

POSTCARD SWING CARD

OPEN SWING CARD
SWING CARD FRONT
Regal make these lovely swing cards already cut, folded and ready to decorate, as well as the stickers, papers and even the postcard, so if you are looking for a quick to make card which has great impact, gather your supplies and have fun!

Friday, 29 December 2017

CARD FEATURING A METAL FLOWER

METALLIC FLOWER EMBELLISMENT
If you're like me, the combination of summer and Christmas has resulted in more than the usual amount of potentially useful craft items.

Soft drink cans are a case in point. As long as you use the fairly thin ones and proceed carefully, it's possible to both die-cut and emboss them to make embellishments.

The red flower on this card has been made from a diet coke can and a floral nesting die.  As there was a lot of red on the can, I was able, by careful positioning of the die to avoid having to colour anything.  (The stamen was cut from a silver section, and the whole stack held together with a silver split pin).

Mostly, the reverse side of a softdrink can is silver, however, so if you do need to add colour, the marker pens that you use to colour rhinestones and peel-off stickers can be used.

Thin aluminium is easy to shape so adding additional dimension is really easy.

The background is just metallic pens through a floral stencil onto black card, and I've added a bit of curling ribbon to make it match in, as the gold pen seemed to dominate.

Friday, 22 December 2017

HOLLY CHRISTMAS CARD

LAST MINUTE CHRISTMAS CARD
OK, so if you are still making cards by this time of the year you are after something super quick to finish, and here it is!

Sharon has used a Regal holly cut-out card, put some patterned green paper underneath, and then added some gold greeting stickers and stars and a few red rhinestones and well....it's finished!

Unfortunately Regal will not be re opening until January 2nd but its an idea to keep in mind if you have to make a lot of cards next year, or if perhaps you'd just like to get the Christmas Cards out of the way in January.

Just think how proud of yourself you can feel for the rest of the year, especially in December when many more of us are in panic mode!

Friday, 15 December 2017

CHRISTMAS TREE CARDS

CHRISTMAS TREE CUT OUT CARDS
By this time of year, if you haven't already made your cards its time to get busy.

These two examples are both quick to make and really pretty too.

Sharon has used a gold base card.  You can buy gold cards in both single and three panel versions from Regal (which is also where the foiled white paper came from), or if you are in a huge hurry, you can get cards with the tree already cut out in white, red or green.

Sharon has put paper under the cut out panel of one card and used the shape for the other.  She has crimped the tree, but you could equally well emboss it, decorate it in other ways or just leave it plain. Adhesive pearls and fabric stars comple the cards.

If you are well prepared and use pre-cut cards,  you could just about finish both of these in under ten minutes - great if you still have a lot of cards to make before the big day!

Friday, 8 December 2017

PHOTOSLOT CHRISTMAS CARD

Postcard Christmas Card
Sharon has combined a few elements to make this super-quick Christmas card.

First take a postcard (this one is available from Regal, as is the base card), slot it into a photoslot card.  Add (optional) decoration and off you go!

Regal's photo slot cards are designed to take a 6" x 4" (15cm by 10cm) photograph so if you have something special that you want to share it's still not too late to get some printed and posted for Christmas.

It's the ideal "handmade" card when you don't have time to make a handmade card!

Friday, 1 December 2017

TWO DIFFERENT STACKER CARDS FOR CHRISTMAS

TRADITIONAL STACKER CARD
These cards show a couple of different ways to assemble a stacker card - the traditional approach of stacking the layers one on top of the other from largest to smallest, and an alternative which is to do the same but to offset each layer a little (as shown in the bottom card).

The white card is one of Regal's lattice cards, folded a little differently to usual, whilst the brown card is a Kraft brown singlefold square, also from Regal.

The stacked designs are both off the same sheet (HA111), which, as you have probably guessed already, is currently in stock exclusively at Regal Craft Cards.
OFFSET STACKER CARD

Friday, 24 November 2017

CHRISTMAS GREETINGS FROM AUSTRALIA

CHRISTMAS GREETINGS FROM AUSTRALIA
If you haven't already taken care of the Christmas card situation for overseas friends and relatives, you need to start giving the situation some serious thought now.

As time is of the essence, another quick card from Sharon is in order.

Regal make these Australia cut out cards in three colours - white, green and ivory, so all you need to do is pop some pretty paper in the aperture and embellish if desired (Sharon has used a paper poinsettia and leaves from Green Tara).

This card has been made in traditional Christmas colours but you could go for an outback palette of ochre, gold and burnt orange if you wanted something really different, and add a die-cut Australian animal or plant (Ultimate Crafts make some good ones) as embellishment.

Regal do some state cards as well, so if you want to be very geographically specific its worth contacting them to ask about availability.  I know that there are certainly Tasmania cut-outs.

Friday, 17 November 2017

CHRISTMAS PRESENT CARD

CHRISTMAS PRESENT CARD
As you've probably guessed by now, Sharon did the Christmas demonstration for Regal Craft Cards back in September, and we can now all enjoy a selection of her cards.

This is another quick card - just the sort of thing that's needed as Christmas gets closer.

She has placed a piece of decorative paper under the cut-out of one of Regal's square windowpane card (XSWP2), and covered the central cross with strips of shiny metallic paper, to make a "present."

A paper bow finished the project.  Sharon has cut her own, but you could use a diecut or even real ribbon as an alternative.

You could easily adapt this card for many different occasions simply by changing the colour choice.


Friday, 10 November 2017

FREESTYLE CHRISTMAS TREES

CHRISTMAS TREE CARD
Here's another one of Sharon's fun Christmas Cards.

She has cut the trees and ground freehand (no template required), stuck them to the white basecard, and then added some stars and a greeting from a peel-off sticker pack and its done!

If you have the materials at hand, you can make this card in just a few minutes and its a great way to use up leftovers from the paper stash.

Friday, 3 November 2017

CHRISTMAS PUDDING GIFT WRAP


Front View

Side View
Sharon made this easy but effective Christmas wrap by cutting one of Regal's Cupcake Cards (XSNO3) in half and adding an middle panel to make the base and the top tie.    It would make the perfect wrap for sweets or a cupcake or even a small box of special tea.  You could put the gift in a clear bag (also available from Regal), punch a hole in the top and tie it in the centre for additional security.

Sharon has covered the bottom part of the cupcake with scrapbooking paper, added red mirror card to the cherry and used peel-off stickers to decorate the top, to finish her cheery christmas pudding card

Friday, 27 October 2017

LIQUID CHROME PEN ON GLOSS CARD

GLOSS CARD WITH LIQUID CHROME PEN
Regal sells a range of colours in gloss card but black is a favourite - its just so hard to photograph. particularly under flouro lights.  Still if  you don't know me you now have a picture (of sorts) for reference!

We've just had these really lovely liquid chrome pens come in at Regal.  They give a really shiny silver finish to most surfaces.
For this card I've used them to colour in embossing and wooden shapes as well as to add a couple of hand drawn dots at the end and to rule a silver border around the sides and base of the card.

The photo really doesn't do justice, but the silver looks very effective on the black, so if  you are looking for an engagement or wedding card that's just a little different, something like this might be worth considering,

I folded the DL card myself and if you want to do this, do remember to gently score before folding because the gloss surface can sometimes crack if you don't.

Friday, 20 October 2017

5 MINUTE CROPPED THREE-FOLD CARD

This is another "taster" from the "Shiny" demo to be held by Regal Craft Cards next Thursday (26th October) between 10 and 3.

It  qualifies as a five minute wonder if you have all your supplies at hand (but not if you're like me and spend 3 hours deciding what to put on the card it might take a little longer).

I have cut the end panel of one of Regal Craft Card's three panel cards in half, and covered the other in foiled paper.  I've added a gold diecut (from Kaiser) and a greeting to the cut panel and that's it.

Two of the advantages of this format is that it gives you extra space inside on which to write, but that it can also be used to add a level of privacy when the card is displayed.  The card does sit nicely, and stands out from normal singlefolds.

Friday, 13 October 2017

ART DECO LATTICE SCREEN WITH BOOKMARK

LATTICE SCREEN CARD WITH BOOKMARK
This week's card is a preview of one of the cards that will feature in the demo being held by Regal Craft Cards on October 26th.

It features Regal's lattice card (available in texured white or ivory) folded a little differently to the standard way.

The theme of the demo is "Shine" and there are many elements that fit the bill on this card.  The papers have a lovely metallic gold patterning, whilst the additional decoration comes from Ultimate Crafts "Theatre" paper pad.  The gold bookmark addition is made from two layers of mirror card stuck back to back and cut with the "Ritzy Clip" die, also from Ultimate Crafts.

This is one of the best cards to make -  a super easy, quick project that appears to be nothing of the sort!

Friday, 6 October 2017

OVERLAPPING CENTRE FOLD CARD USING POSTCARD IMAGES

OVERLAPPING CENTRE FOLD CARD
Here's another idea using postcards available at Regal Craft Cards - this one featuring vintage jam labels.

Just construct a centre fold card.  This one has been made especially to fit the images. If you want to adapt the technique for other sizes its easy to make a centre fold card by removing half a panel on either side of a three panelled card).

After you've made your card base, cover it with whatever background paper you like (if you want to).  I've just used a plain dark blue for this example.

If you haven't made your card to fit the images you're using, then cut the images to fit the card - you'll need three, just large enough to cover the height of the card, allowing for a couple of millimetres in between.  Its not a bad idea to back the panels as they are probably a bit more likely to get bent than on a normal card.  In this case, I've just used the same white cardboard used for the base, leaving a little border all around.  This works doubly for this card as it covers the text on the back of the postcard.

Centre all three panels over the fold and tape the top and bottom ones to one side and the middle panel to the other and its done!  I've made it sound much more complicated that it actually is.  Its an effective and easy card form.

Friday, 29 September 2017

HAPPY BIRTHDAY

THERE'S A PEAR ON THERE!
I like to think that this card looks a lot better  in reality.  I end up taking most of the photos for this blog under flourescent lighting which is less than ideal.

This is particularly the case with "shiny things" (as will be featured in Regal's next demo).  The background paper )with gloss features) and foiled greeting bothe come from a Kaiser 6x6 pad, whilst the gold backing circle has geen embossed.

The pear and leaves have all been die-cut from gold paper using the Golden Pear Cluster from Kaiser (and available at Regal). Everything is put together on a Regal base-card - LR50 - which is a three panelled texured white card with a rectangular cut-out featuring a gold-foiled border.

Friday, 22 September 2017

TWO STENCILLED CARDS

STENCILLED AND STAMPED BUTTERFLY CARDS
Stencilling is very much the "in" thing at the moment, and Lee has used a stencil from Fabscraps to make these elegant cards.

On the pink one she has used two different Distress Inks to produce an ombre effect.  The background has been overstamped with a butterfly from a Kaiser stamp and die set, using black Versafine ink.  Subtle accent dots were made with Nuvo Drops, although you could also use Liquid Pearls.

The lavender card only uses one colour of Distress Ink, with the graduated colour effect being produced by using different amounts of ink and pressure through the stencil.  Both greetings are from Darkroom Door's "Simple Sayings" set.

Both these cards are of a simple, but very effective design.  If you haven't tried stencilling before perhaps this is the inspiration you need.  Regal Craft has a large range in store, as well as a huge selection of base cards

Friday, 15 September 2017

5 MINUTE BIRTHDAY CARD

This five minute marvel is a Lois/Heather joint effort (two and a half minutes each?)

Sometimes time is of the essence but you still want to give a handmade card so assemble some pretty paper, a greeting sticker a pretty picture and a bow.  Arrange it all on a base card from Regal Craft cards and away you go!

Friday, 8 September 2017

THANK YOU CARD USING QUATREFOIL LAYERED DIES

CLOSE-UP OF LAYERED DIES
QUATREFOIL LAYERED DIE
Lee has used two quatrefoil dies from Paper Roses (and available from Regal Craft Cards) to make this elegant "thank you" card.  The white on white detail is not shown to best advantage in the photograph, but you can see from the additional die cuts in white (layer 1) and gold (layer 2) how one die fits on top of the other for a layered/textured effect.  Of course each can be used separately and thus they are very versatile.

The flowers are layered too!  Kaisercraft's "Thank You" die and stamp set, come with both solid and outline stamps to save having to colour the image plus the die so you don't even have to worry about fussy cutting!  Even the greeting has a matching die.

Friday, 1 September 2017

ANOTHER CARD FEATURING A POSTCARD - SUITABLE FOR FATHER'S DAY

CHEERFUL SAILOR CARD
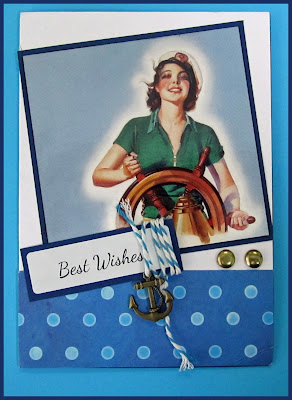
This cheerful card was made by Marilyn using a postcard available from Regal Craft, placed on a white single fold card, decorated with patterned paper.

She has trimmed the picture, and matted it on a dark blue border, and added a similarly matted sticker (once again from Regal).

Marilyn has embellished the card with an anchor charn "tied" with twine to the greeting, and added a couple of split pins to finish.

Father's Day might be on Sunday, but you'll still have time to finish this card if you start right now!  Otherwise its a good one to have in the cupboard as its suitable for both sexes and all sorts of occasions!

Friday, 25 August 2017

VELLUM PEEK-A-BOO CARD

VELLUM PEEK-A-BOO CARD

INSIDE THE CARD
We're having a bit of a "masculine" card-fest at the moment, and here's another.

A piece of decorative paper is stuck to the front of a singlefold white Regal Craft card, and a sticker is placed on top (I've used a
Sparklelight sticker from Regal SLS2009).

Cut vellum large enough to wrap around the card (i.e. the same height as the unfolded card, and every so slightly wider) and fold it in half.

Slip it over the card and mark (in soft pencil) the corders of the sticker, then remove, and either use a punch upside down or tape on a square die to cut out a window in the vellum.  (You can also use a craft knife).  Put a small piece of double sided tape just over the fold on the back of the white card, and carefully place the vellum over the top.  (You might want to do a test run first to make sure the window is in the right place).

Double sided tape can be seen through the vellum so you can either put it on carefully and leave it "as is" or add a border sticker or strip of paper over the top.  (If it really worries you, you can always sew the two layers together - three or 5 holes and some decorative thread are probably best as vellum tends to perforate with sewing machined lines)

Add a charm and greeting on the outside, and a different sticker and a paper border (matching the front of the card) to the inside and you're done.

In reality the patterned paper can be seen more clearly under the vellum on the front of the card, and the contrast between the shine of the sticker and the matte finish of the overlay is quite pronounced

Friday, 18 August 2017

3D PICTURE USING POSTCARDS

CARD FRONT

INSIDE THE CARD
Here's another card suitable for anyone really but probably timely with Fathers day just around the corner.  (You have no idea how long that paragraph took to complete as in the US, the apostrophe goes between the r and s, whereas in the UK it goes after the s, and in Tasmania I'm just confused.
I wimped out and didn't add one at all so put it where you want!)

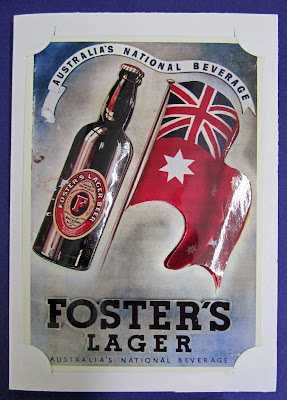
Anyway, back to the card - Regal has a spectacular range of vintage postcards.  I've used one as the base and cut and shaped (just using my fingers and the palm of my hand) elements from another couple to stick on top with foam tape.

The 3d effect is much more pronounced in reality that it appears on screen - the bottle is nicely rounded, and the flag does look a bit fluttery.  This post is turning into a bit of a repository of random information, but just in case you are thinking "but the flag should be blue"............The red ensign was in use from 1901 to 1954 and was the civil flag i.e.blue was for government and red was used if you wanted to fly an Australian flag in your backyard.  Needless to say everyone got very confused and the red flag is now only used at sea.

Getting back to the card (again) I've made a simple pop up machanism for inside, and used a Regal photo slot card as an easy way to mount the postcard on the front.

Friday, 11 August 2017

A CALENDAR FOR DAD

FATHER'S DAY CALENDAR
Here's an idea for a father's day card that will last for over a year.
(You can, of course adapt it for any occasion).

Just start with a centre stepper card (STE1), decorate it with co ordinating papers (these were from the small pad in the Kaiser High Tide collection) and add a 2018 calendar and you're done!  All these things are currently available from Regal Craft Cards, including the double-sided tape to stick it all together!

TIP - when you're fussy cutting around objects with fine detail, such as the wheel, leave a small border - it saves having to deal with all the little inny-outy bits and looks good too!

FRIDAY UPDATE

New dies and papers in at Regal Craft cards this week.  There are limited quantities so don't miss out!  Also, don't forget that on Thursday 17th of August (that's next week for folks reading this in real time) there will be a special 20% day off in the shop - a great chance to stock up on blank cards etc in time for Christmas card making, or to build up your collections of papers and stamps. Oh yes, I nearly forgot 50 packs of Kraft singlefold cards with envelopes are on special until they are replaced with something else on Monday - just $12.00 a pack if you come in today or Saturday!

Friday, 4 August 2017

CARDS FEAT. BBQ AND PICNIC TABLE DIES

Well, here's something a little bit different...............Its a bit on the cold side to be contemplating barbies and sun umbrellas, but it doesn't stop me dreaming...............

I've used a couple of bases from Regal Craft Cards as well as a couple of Paper Roses dies (purchased from Regal as well) to make some very straightforward cards.  Basically I've just cut out the shapes in a few colours and re assembled the pieces, added a greeting stamp and, in the case of the BBQ a triangular background, and that's it.

These dies are different to most of the other ones that are out there, and they can be used for a number of different occasions, plus they're great for the "blokey" cards that a lot of crafters seem to find difficult.  What I really love though, is that the shapes can be used in so many other ways.  Look at the umbrella for instance, turn it upside down and cut it in woodgrain as a fruit bowl, add some chain border stickers for a hanging basket, turn it on the side for fairy or butterfly wings, or add a head and legs for a tortoise etc etc etc.  I've lots of other ideas for all the other bits in both die sets, but would ruin your fun if I listed them all......what do you see when you look at the parts separately?

SUMMER CARDS