Friday, 5 August 2016

PURPLE FAN CARD

PURPLE FAN CARD
This isn't quite a 5-minute wonder. but it's close.  Regal sell the purple fan cut-out cards ready to decorate, so all I did was add some decorative (Fab Scraps) paper underneath the aperture, then a couple of slices of the fan cut-out (which comes with the card), which I had embossed.
A few pieces of 3mm ribbon covered my messy edges and a satin flower disguised the fact I can't tie a bow to save myself!

This is a good beginner's card, suitable for lots of different occasions E.g. make a white one for a wedding, or add red, grren and gold papers and embellishments to an ivory card for Christmas

Friday, 29 July 2016

KITE FOLD FLOWER

Here's a cute idea.  I've just recycled some magazine pages (quilting ones especially are great as a source of small papers) and cut some little squares, I've folded the edges to the centre to make a kite shape and then just stuck them down.  An embossed circle hides any messy middle (not that his one HAS a messy middle).  THe leaves are just the same sized squares with both ends folded in, a strip of orange paper makes the stem and the greeting is made with a Kaiser die.  The whole thing is mounted on a textured white DL singlefold card (DL1) from Regal Craft Cards.

This is a fun economical card, which would be great to give to children, or fun to make with them.

Friday, 22 July 2016

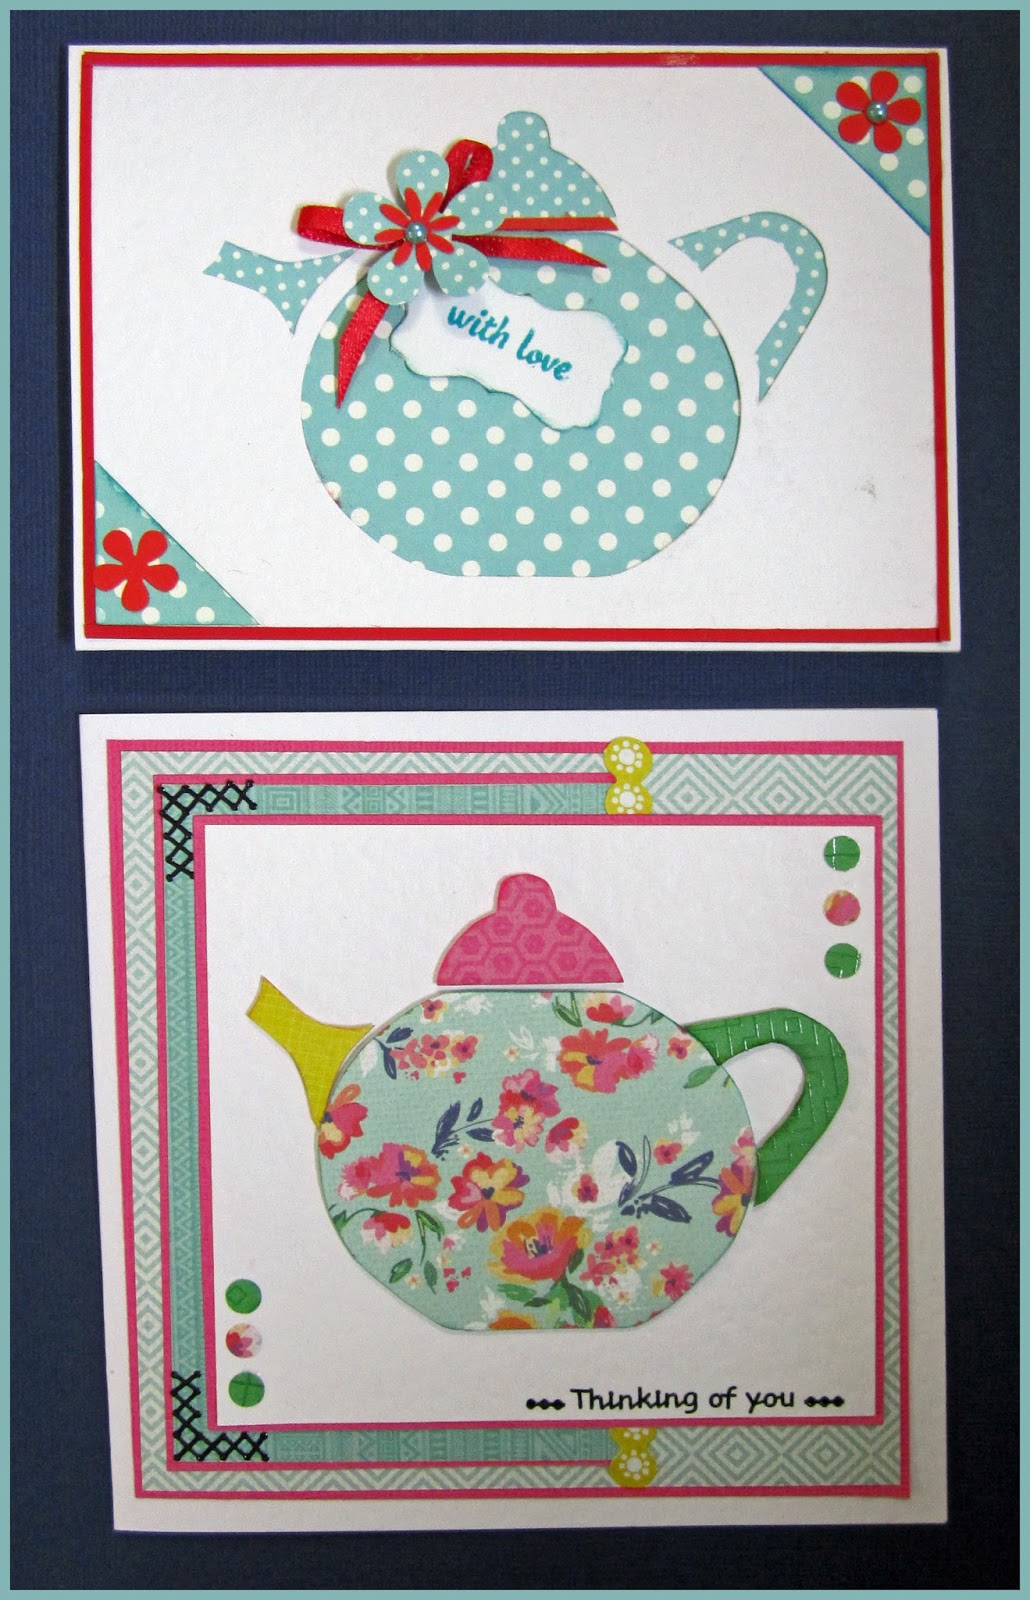
TWO TEAPOTS

TEAPOT CUT OUT CARDS
Tania has provided us with a couple of great ideas of how to decorate Regal Craft Card's teapot cut-out card (XNO55).

These cards would make a great accompaniment for a gift of special tea or a teapot or cup, and are perfect for morning or afternoon tea invitations.

All you  need are some pretty papers or fabrics and  few embellishments and off you go!

Friday, 15 July 2016

PARCHMENT and PICKPOINT

SIMPLE PARCHMENT CARD
Parchment craft is often portrayed as really complicated and as something that can only be done with a huge selection of tools.  It certainly can be that way, and Regal Craft Cards do stock a great range of tools for the advanced crafter.

It doesn't have to be that way, however, and this example shows what is possible for the first time crafter, requiring only a piece of parchment paper, a white pen, an embossing stylus and a soft rubber mat.  The pattern comes from Embossing Paper the Easy Way (available from Regal).  Just trace the picture with a white pen, when the ink is dry turn it over, retrace and add detail with the embossing stylus.  Add an insert and you're done.  

Balance out the weight of the outer card and insert so that it will stand up e.g. thin parchment with thick insert etc.  There are many ways to attach the insert to the outer card.  A little double sided tape on the inner back panel will do the trick, but for this example I've chosen to tie it together with some 3mm satin ribbon.

As a bonus this week, we have some more of Sandra Bell's lovely pickpoint cards, made with a variety of coloured metallic threads which give the design a special lift.  The last three designs are from the Garden Flowers design sheet (PPF11)
FOUR PICKPOINT CARDS

Friday, 1 July 2016

OWL CARDS

SIDE-STEPPER OWL CARD
How cute are these owl cards that Marilyn has put together.

The owls are from a Kaiser paper called "HOOT" from the "Hello Sunshine" collection that came out some time ago.  They have a glossy finish, and have been fussy cut from a 12 x 12 page.

The first card base is a side stepper from Regal Craft Cards (ST1).  In addition to the owls, Marilyn has added skeleton and paper leaves, green paper roses and handmade papers.

The second example uses a soft cream Regal deckle oval card-base (OVD3). Marilyn has added some little red paper flowers, with silver-grey pearls have been added to the centre.  Small silver rhinestones make the owl's eyes sparkle,


Friday, 24 June 2016

RED SQUARES - AN EASY 5 MINUTE CARD

RED SQUARES
I often look at the cards I make and think "Oh dear....", but I like this one.  I especially like it because its a great emergency card design for all occasions - just change the colour(s) and greeting to suit.

I've used a smooth white singlefold card from Regal Craft Cards as the base - they have lots of colours available if you fancy another alternative.

Next its just a matter of choosing a square hole punch or die (or ruler and craft knife) to cut some squares - any size will do - these are a little over 1 1/4 inch.  Any paper will do too, as long as yoy like it and think it goes together.  These are from a Kaiser paper pad, but experiment with old book pages, rainbow colours, embossed papers etc.

Arrange the squares in a way you find pleasing - I've put these on edge, left a little gap between them, and run them off the sides of the card, but there are lots of other choices - a grid, a portrait orientation, a mixture of small and big squares etc.

All that's left is to add a greeting.  I've used a pre-made one, but the circle is a good idea as it contrasts with the squares, and stands out a little more because I've popped it onto a foam "sticky fixer" and positioned it approximately a third of the way across, and down - a position that naturally draws the eye.

Give yourself permission to play!!


Friday, 17 June 2016

THREE PICKPOINT CARDS

THREE PICKPOINT CARDS
I featured some of Sandra Bell's lovely pickpoint cards some time ago.

Her attention  to detail and interesting use of colour mean that I'm always keen to see more of her work.

Fortunately when Sandra brought in a collection of her cards last week she said that she would be happy for me to share them on the blog.

If you enjoy pickpoint (patterns are available from Regal Craft Cards), then some ideas to "borrow" include the use of a variety of metallic threads to complete each pattern and a sewn greeting.  Two different ways have been used to mount the work - the first card is sewn on a textured three panel card (PT1), whilst the other two have been sewn onto cardstock and then mounted onto the top of singlefold cards.  (Note the rounded corners)

I've just posted a photo of just three of Sandra's cards this week, but keep looking back over the next few weeks for more examples!

Friday, 10 June 2016

SUNBONNET SUE

PAPER-PIECED SUNBONNET SUE
I've used one of Regal's scallop-edged cards as a base for this little card.  "Sue" is a traditional applique pattern - you'll find lots of variations on-line and in quilting books.  I just cut the pieces out of paper rather than fabric (much easier!!) and assembled them on an embossed background, stuck to some patterned paper.  All that remained was to add a diecut greeting and a little bow!


Friday, 3 June 2016

5 QUICK CARDS

5QUICK CARDS WITH 3D TOPPERS
I wanted to make some quick cards using the Art Deco Sparklelight 3D sheet (SLDC48750) and here they are!  I've basically just used a selection of Regal base cards and kept the "topping" super simple.

Going around clockwise from the top left hand card, I've used the Ivory textured corner oval with a gold border(XCOS51), the lattice special fold (XNO42) with one panel removed, XCOS51 again, then the scallop ivory card (XSCE2), and finally the Nightclub Purple Rectangle Two Square (XWIT2).

Once the hard work has been done with a distinctive and good quality base card it really only takes a couple of minutes for the "dressing."  I've put these cards in the 5 minute wonder category although it does rather depend on how quick you are at assembling the 3D toppers.  (They are die-cut so that certainly helps!)

Friday, 27 May 2016

KAISER PAD CARD FOR DAD

A QUICK CARD FOR DAD
Just a quick little card using "leftovers" from the 6.5" KAIser pad from the "On the Farm" collection.  As these pads come with greetings, labels, shapes and suchlike, could make a similar layout from most of them.

I've used a Regal base card, but cut the front panel a little shorter to reveal the second paper inside the card, and mounted the label, greeting and arrow on red to separate them from the background (they matched in a bit too well before).  A couple of starry split pins, a bit of brown ink around the edges and a piece of twine later it's done.

The position of the arrow draws attention to the greeting (the horses on the label are "looking at it" too), which is positioned about a third of the way down and about two thirds of the way across the front of the card for added impact.

Its not quite a 5 minute card but close!

Friday, 20 May 2016

TEXTURE PASTE TASSIE

TASMANIA WITH TEXTURE PASTE
I used a couple of products from Regal Craft Cards to make this card which would be good for a Bon Voyage greeting.  The first was one of their square singlefold textured white cards, and the other was their Tasmania cut-out, which I used as a stencil.

I applied a thick coat of modelling paste through the cut out, and used a butter knife (I do own little palette knives but they were at home in the drawer) to add texture.   I could have used some acrylic paints to add colour but liked the simple blue and white effect.

The greeting is from the Ultimate Crafts Australiana pad, and has been coloured with Tombow pens.

Friday, 13 May 2016

TASSIE DEVIL EASEL CARD

TASSIE DEVIL CONGRATULATIONS
An often overlooked source of card toppers are postcards!  This fearsome fellow is from Tas Postcards and Souvenirs.

An extra fold has made one of Regal's 3 panel square cards into an easel so that he sits up on display.  The circle that keeps him upright is made from paper clay using a combination of techniques - first it was made light green by colouring with a green marker onto a little white ball of clay and then mixing it through by kneading.  I rolled the clay out, pressed it onto an embossing folder and left to dry, the die cut into a circle and brushed over with a black ink pad.  It sounds complicated but if you work step by step its easy!

The card just squeezes through as standard thickness and as paper clay (Magic clay) is very light, doesn't weigh too much so you could send this as a special greeting from Tasmania, although I think that a pre-schooler might like it for their birthday too! I've added a "Congratulations" peel off sticker, honestly just because it was in the cupboard......you could add your own greeting with either a sticker, a computer print-out, stamp or die-cut to suit the occasion.

One of the nicest things about working in a craft shop is that you meet the loveliest people - some of whom we see each week, and come to regard as friends.


Friday, 6 May 2016

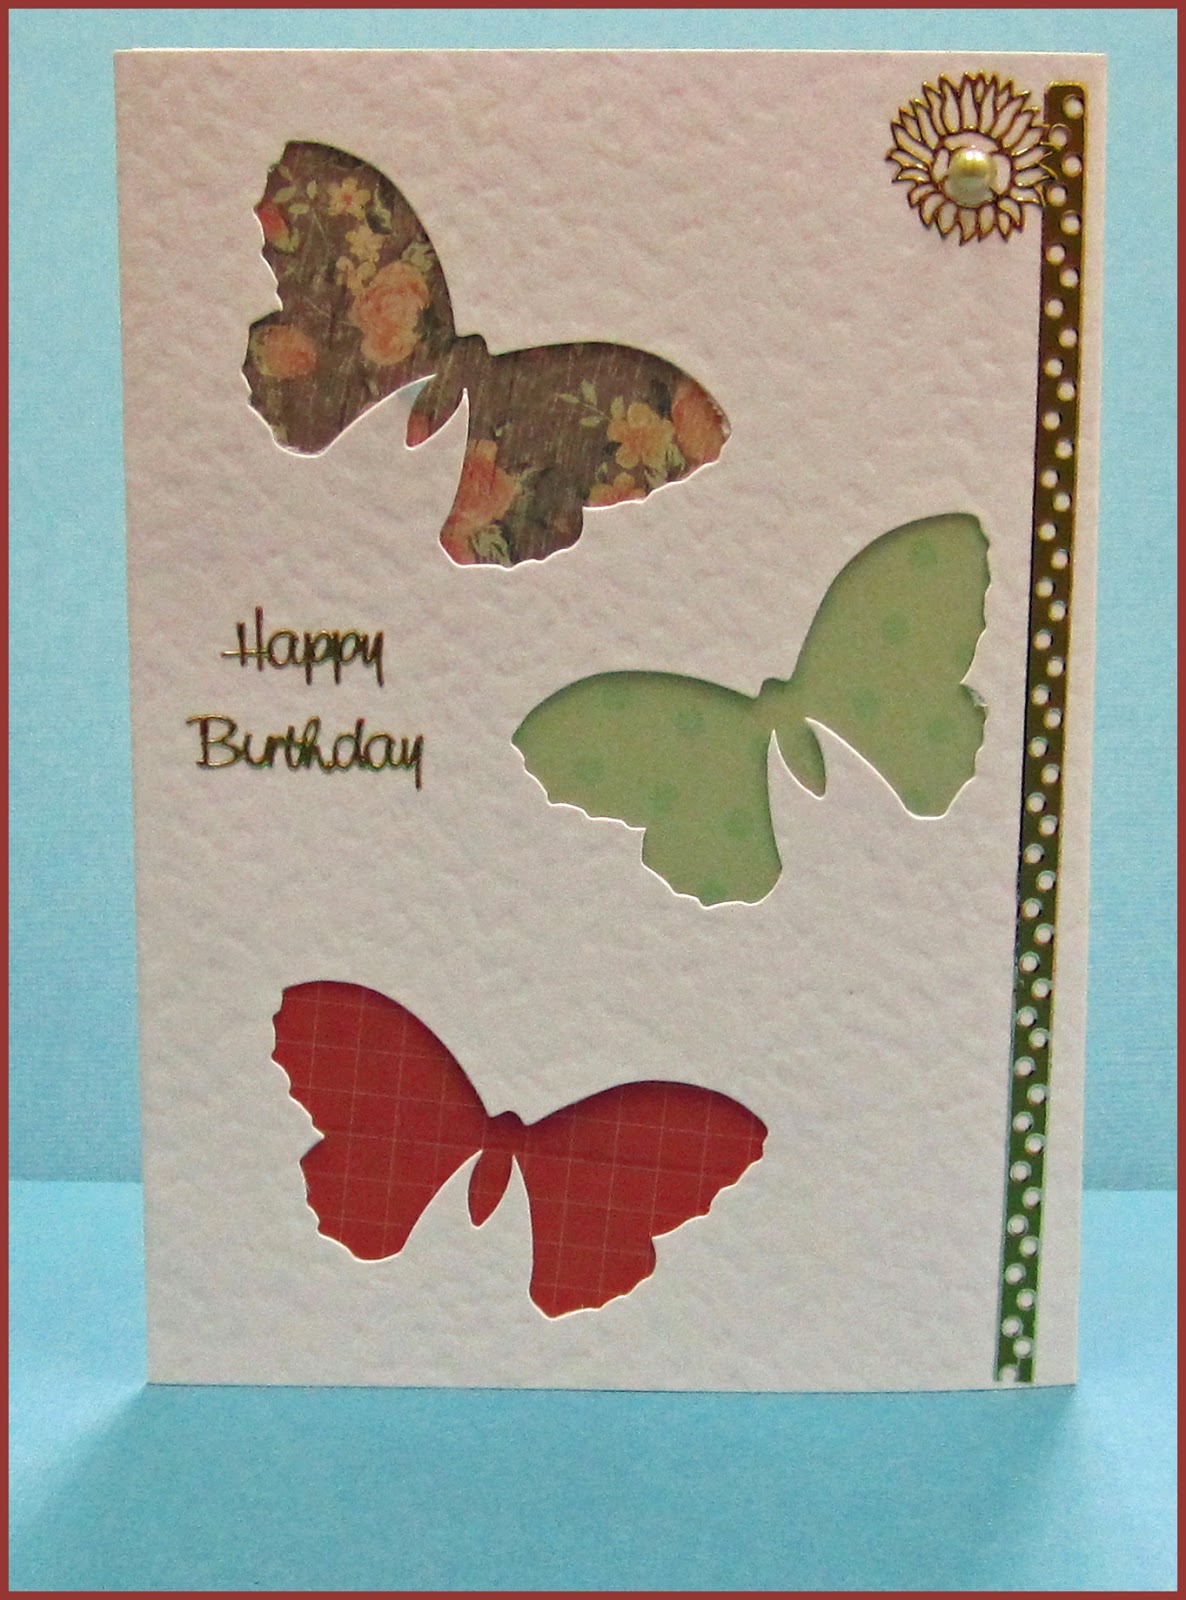
3 BUTTERFLY CUT OUT CARD

QUICK BUTTERFLY CARD
If you have the right base card like this one from Regal Craft Cards you can make a handmade card in record time.

Sharon has added a selection of pretty papers to Regal's white textured 3 butterfly card (NO58 or XNO58). (You don't even need to cut neatly as the card's third panel folds underneath to hide the back). A couple of stickers and an adhesive pearl later and your work is done!

This is a really nice way to use up left-overs or to showcase really special papers.

Friday, 29 April 2016

PAPER CLAY SHELL CARD

BEACH-THEMED CARD
Paper Clay (Magic Clay) is a great material for cards as you can make some quite substantial embellishments without adding excess weight.

In this example I've used some paper from the Ultimate Crafts Australiana collection and added some shells made by stamping some inked Darkroom Door stamps into paper clay that has been rolled flat.  I cut around the images for this card whilst the clay was still wet, but have done a bit of experimenting since then and find that its probably easier to stamp then allow the clay to air dry and simply cut out the images with scissors!

I'v left the space under "Post Card" which you could also do, but if you wanted to add additional words or a greeting there is plenty of room to do so here.

Friday, 22 April 2016

"NOSTALGIC CHILDHOOD" STEPPER CAR

STEPPER CARD FOR BIRTHDAY OR MOTHER'S DAY
Unfortunately neither Sparklelight nor 3D pictures photograph easily, and I really haven't done justice to Sharon's card.

The picture sheet is called "Nostalgic Childhood (SLDC 48574) and is from Regal Craft Cards, as is the white smooth step base card (XST1)

Sharon has added words from a Kaiser Collectables pack and a "Happy Birthday" silver outline sticker as well as decorative papers and a paper daisy with an adhesive pearl centre.

This would make a lovely Mother's Day card too!

Friday, 15 April 2016

KANGAROO STAMPED CARD

CARD WITH A KANGAROO 
We make lots of reindeer cards, and rabbit cards. There are robins and lions and bears......but it's nice to know that there are some products out there that feature Australian animals.  This kangaroon stamp, which is from a Darkroom Door set, is a great example.

I've stamped it onto craft card with black ink and just added a tiny bit of colour with a brown pencils.  The other products used are Australian too - the paper is from Ultimate Crafts Australiana series, the embossing folder (inked after use with brown ink) is from Kaiser,  and the card is, of course from Regal Craft Cards!

I haven't added a greeting but it could be anything from a birthday card to a bon voyage to a notecard to an overseas friend.

Friday, 8 April 2016

SIMPLE FOUR WINDOW CARD

HOME IS WHERE OUR ANCHOR DROPS
Sometimes the nicest cards are simple but elegant, and Sharon's card from her recent demo is a good example of this.

She has used a white smooth four window card (XSWP2) from Regal Craft Cards as her base.
The papers underneath the windows come from Kaiser, as does the greeting, which had been attached with foam tape to raise it a little above the surface.  This not only draws attention to the words but provides a place to "hide" the ends of the string from the top of the anchor charm.

Once again the design could be easily adapted for a variety of occasions.


Friday, 1 April 2016

A NEW WAY TO USE A SWING CARD

THE OPEN CARD
THE CLOSED CARD
I saw a card in a magazine recently which wasn't really like this example at all, but it did set me thinking about how cards could be folded in different ways.

This is one of Regal's swing cards (XSWI1) with an additional fold in the centre of the two larger panels.  That way, the panel no longer swings but sits out on show when the card is opened (as in the example on the left) or closed (see above).  So the the card remains closed, tuck the panels either side underneath the "Happy Birthday" panel.

I've used papers out of the paper pad from the "Old Mac" collection, but you could re-make this card in all sorts of ways - e.g. with flowers on the centre panel and patterned paper behind.

Friday, 25 March 2016

COLOURED DIE CUT ON A PHOTOSLOT CARD

Coloured Die Cut Card
This photoslot card from Regal Craft Cards features one of the dies from the Ultimate Crafts Australiana collection.

All I've done is use some alcohol markers to add some colours (any colouring media would do) and it makes a real statement on a black background.  It's actually deceptively easy to colour because you can just go off the edge with most of the shapes so you don't need to have ultra good fine motor skills (i.e. it looks much more fiddly than it actually is!).  The die-cut is from smooth white card so all that was necessary for the cocky was to add a little hint of yellow.

I've coloured in a greeting and a butterfly from the Australiana colouring pad, backed it with some green card and popped it all in a white textured photoslot card base from Regal Craft Cards

Friday, 18 March 2016

A QUICK BIRTHDAY OR FATHER'S DAY CARD

"MALE" ALL-OCCASION CARD
This is another card that Marilyn made featuring papers from the Graphic 45 "World's Fair" collection.  It would make a great Father's Day or Birthday card and is quick and easy to put together.

Using the colours featured in the patterned papers as a guide, Marilyn has double matted orange and blue plain papers as a background, and added a border made from orange linen ribbon, trimmed to a double point at the end.

The words (also cut from the paper) have been mounted using foam tape to add dimension.

Friday, 11 March 2016

SYDNEY HARBOUR HIDDEN JOURNALLING CARD

SYDNEY HARBOUR JOURNALLING CARD
This card is quick to make but can be used in a couple of ways.  "As is" it makes a great heading for a scrapbook page with plenty of space on an insert to journal details of the "weekend away" without it being on show to everyone who looks at the album.

As I've used alphabet stickers to add the words, you could easily substitute "Greetings from Australia" or even "Happy Birthday" etc and use it as a regular card.

The base is a lovely intense blue shimmer, and already has the apertures cut, as well as a third panel to fold under to "hide" the back.  (Regal's "King's Blue Rectangle 'two Square card - WIT5).  The diecut chipboard and the picture of the bridge are from Ultimate Crafts Australiana range, and the anchor is a metal charm attached with a small black split pin.

Friday, 4 March 2016

PARCHMENT SAILING SHIP CARD

PARCHMENT SAILING BOAT
Kaiser products feature in this card which would be OK for a birthday, father's day or bon voyage.

The caption is from one of the papers in their Sailaway range, and both dies are also made by them.

The slightly "tricky" feature is the ship which has been cut out of parchment paper and then embossed by hand with an embossing tool on a soft mat.  I've then used a pin to add tiny holes around the outside of the main parts.

As parchment/vellum is translucent I've cut foam tape to shape and size to fit under a couple of the sails so that although it can be seen, hopefully it just looks like part of the design.

I made this card for a recent demo, but if I were doing it for an actual card. I'd probably cut a second ship from faux wood paper for the hull and masts and just use the embossed vellum for the sails.

The base card is a large textured square white card from Regal Craft Cards(XSQPL1), and I've added just a little decoration to the inner panel, as you can see from the picture.