Friday, 29 December 2017

CARD FEATURING A METAL FLOWER

METALLIC FLOWER EMBELLISMENT
If you're like me, the combination of summer and Christmas has resulted in more than the usual amount of potentially useful craft items.

Soft drink cans are a case in point. As long as you use the fairly thin ones and proceed carefully, it's possible to both die-cut and emboss them to make embellishments.

The red flower on this card has been made from a diet coke can and a floral nesting die.  As there was a lot of red on the can, I was able, by careful positioning of the die to avoid having to colour anything.  (The stamen was cut from a silver section, and the whole stack held together with a silver split pin).

Mostly, the reverse side of a softdrink can is silver, however, so if you do need to add colour, the marker pens that you use to colour rhinestones and peel-off stickers can be used.

Thin aluminium is easy to shape so adding additional dimension is really easy.

The background is just metallic pens through a floral stencil onto black card, and I've added a bit of curling ribbon to make it match in, as the gold pen seemed to dominate.

Friday, 22 December 2017

HOLLY CHRISTMAS CARD

LAST MINUTE CHRISTMAS CARD
OK, so if you are still making cards by this time of the year you are after something super quick to finish, and here it is!

Sharon has used a Regal holly cut-out card, put some patterned green paper underneath, and then added some gold greeting stickers and stars and a few red rhinestones and well....it's finished!

Unfortunately Regal will not be re opening until January 2nd but its an idea to keep in mind if you have to make a lot of cards next year, or if perhaps you'd just like to get the Christmas Cards out of the way in January.

Just think how proud of yourself you can feel for the rest of the year, especially in December when many more of us are in panic mode!

Friday, 15 December 2017

CHRISTMAS TREE CARDS

CHRISTMAS TREE CUT OUT CARDS
By this time of year, if you haven't already made your cards its time to get busy.

These two examples are both quick to make and really pretty too.

Sharon has used a gold base card.  You can buy gold cards in both single and three panel versions from Regal (which is also where the foiled white paper came from), or if you are in a huge hurry, you can get cards with the tree already cut out in white, red or green.

Sharon has put paper under the cut out panel of one card and used the shape for the other.  She has crimped the tree, but you could equally well emboss it, decorate it in other ways or just leave it plain. Adhesive pearls and fabric stars comple the cards.

If you are well prepared and use pre-cut cards,  you could just about finish both of these in under ten minutes - great if you still have a lot of cards to make before the big day!

Friday, 8 December 2017

PHOTOSLOT CHRISTMAS CARD

Postcard Christmas Card
Sharon has combined a few elements to make this super-quick Christmas card.

First take a postcard (this one is available from Regal, as is the base card), slot it into a photoslot card.  Add (optional) decoration and off you go!

Regal's photo slot cards are designed to take a 6" x 4" (15cm by 10cm) photograph so if you have something special that you want to share it's still not too late to get some printed and posted for Christmas.

It's the ideal "handmade" card when you don't have time to make a handmade card!

Friday, 1 December 2017

TWO DIFFERENT STACKER CARDS FOR CHRISTMAS

TRADITIONAL STACKER CARD
These cards show a couple of different ways to assemble a stacker card - the traditional approach of stacking the layers one on top of the other from largest to smallest, and an alternative which is to do the same but to offset each layer a little (as shown in the bottom card).

The white card is one of Regal's lattice cards, folded a little differently to usual, whilst the brown card is a Kraft brown singlefold square, also from Regal.

The stacked designs are both off the same sheet (HA111), which, as you have probably guessed already, is currently in stock exclusively at Regal Craft Cards.
OFFSET STACKER CARD

Friday, 24 November 2017

CHRISTMAS GREETINGS FROM AUSTRALIA

CHRISTMAS GREETINGS FROM AUSTRALIA
If you haven't already taken care of the Christmas card situation for overseas friends and relatives, you need to start giving the situation some serious thought now.

As time is of the essence, another quick card from Sharon is in order.

Regal make these Australia cut out cards in three colours - white, green and ivory, so all you need to do is pop some pretty paper in the aperture and embellish if desired (Sharon has used a paper poinsettia and leaves from Green Tara).

This card has been made in traditional Christmas colours but you could go for an outback palette of ochre, gold and burnt orange if you wanted something really different, and add a die-cut Australian animal or plant (Ultimate Crafts make some good ones) as embellishment.

Regal do some state cards as well, so if you want to be very geographically specific its worth contacting them to ask about availability.  I know that there are certainly Tasmania cut-outs.

Friday, 17 November 2017

CHRISTMAS PRESENT CARD

CHRISTMAS PRESENT CARD
As you've probably guessed by now, Sharon did the Christmas demonstration for Regal Craft Cards back in September, and we can now all enjoy a selection of her cards.

This is another quick card - just the sort of thing that's needed as Christmas gets closer.

She has placed a piece of decorative paper under the cut-out of one of Regal's square windowpane card (XSWP2), and covered the central cross with strips of shiny metallic paper, to make a "present."

A paper bow finished the project.  Sharon has cut her own, but you could use a diecut or even real ribbon as an alternative.

You could easily adapt this card for many different occasions simply by changing the colour choice.


Friday, 10 November 2017

FREESTYLE CHRISTMAS TREES

CHRISTMAS TREE CARD
Here's another one of Sharon's fun Christmas Cards.

She has cut the trees and ground freehand (no template required), stuck them to the white basecard, and then added some stars and a greeting from a peel-off sticker pack and its done!

If you have the materials at hand, you can make this card in just a few minutes and its a great way to use up leftovers from the paper stash.

Friday, 3 November 2017

CHRISTMAS PUDDING GIFT WRAP


Front View

Side View
Sharon made this easy but effective Christmas wrap by cutting one of Regal's Cupcake Cards (XSNO3) in half and adding an middle panel to make the base and the top tie.    It would make the perfect wrap for sweets or a cupcake or even a small box of special tea.  You could put the gift in a clear bag (also available from Regal), punch a hole in the top and tie it in the centre for additional security.

Sharon has covered the bottom part of the cupcake with scrapbooking paper, added red mirror card to the cherry and used peel-off stickers to decorate the top, to finish her cheery christmas pudding card

Friday, 27 October 2017

LIQUID CHROME PEN ON GLOSS CARD

GLOSS CARD WITH LIQUID CHROME PEN
Regal sells a range of colours in gloss card but black is a favourite - its just so hard to photograph. particularly under flouro lights.  Still if  you don't know me you now have a picture (of sorts) for reference!

We've just had these really lovely liquid chrome pens come in at Regal.  They give a really shiny silver finish to most surfaces.
For this card I've used them to colour in embossing and wooden shapes as well as to add a couple of hand drawn dots at the end and to rule a silver border around the sides and base of the card.

The photo really doesn't do justice, but the silver looks very effective on the black, so if  you are looking for an engagement or wedding card that's just a little different, something like this might be worth considering,

I folded the DL card myself and if you want to do this, do remember to gently score before folding because the gloss surface can sometimes crack if you don't.

Friday, 20 October 2017

5 MINUTE CROPPED THREE-FOLD CARD

This is another "taster" from the "Shiny" demo to be held by Regal Craft Cards next Thursday (26th October) between 10 and 3.

It  qualifies as a five minute wonder if you have all your supplies at hand (but not if you're like me and spend 3 hours deciding what to put on the card it might take a little longer).

I have cut the end panel of one of Regal Craft Card's three panel cards in half, and covered the other in foiled paper.  I've added a gold diecut (from Kaiser) and a greeting to the cut panel and that's it.

Two of the advantages of this format is that it gives you extra space inside on which to write, but that it can also be used to add a level of privacy when the card is displayed.  The card does sit nicely, and stands out from normal singlefolds.

Friday, 13 October 2017

ART DECO LATTICE SCREEN WITH BOOKMARK

LATTICE SCREEN CARD WITH BOOKMARK
This week's card is a preview of one of the cards that will feature in the demo being held by Regal Craft Cards on October 26th.

It features Regal's lattice card (available in texured white or ivory) folded a little differently to the standard way.

The theme of the demo is "Shine" and there are many elements that fit the bill on this card.  The papers have a lovely metallic gold patterning, whilst the additional decoration comes from Ultimate Crafts "Theatre" paper pad.  The gold bookmark addition is made from two layers of mirror card stuck back to back and cut with the "Ritzy Clip" die, also from Ultimate Crafts.

This is one of the best cards to make -  a super easy, quick project that appears to be nothing of the sort!

Friday, 6 October 2017

OVERLAPPING CENTRE FOLD CARD USING POSTCARD IMAGES

OVERLAPPING CENTRE FOLD CARD
Here's another idea using postcards available at Regal Craft Cards - this one featuring vintage jam labels.

Just construct a centre fold card.  This one has been made especially to fit the images. If you want to adapt the technique for other sizes its easy to make a centre fold card by removing half a panel on either side of a three panelled card).

After you've made your card base, cover it with whatever background paper you like (if you want to).  I've just used a plain dark blue for this example.

If you haven't made your card to fit the images you're using, then cut the images to fit the card - you'll need three, just large enough to cover the height of the card, allowing for a couple of millimetres in between.  Its not a bad idea to back the panels as they are probably a bit more likely to get bent than on a normal card.  In this case, I've just used the same white cardboard used for the base, leaving a little border all around.  This works doubly for this card as it covers the text on the back of the postcard.

Centre all three panels over the fold and tape the top and bottom ones to one side and the middle panel to the other and its done!  I've made it sound much more complicated that it actually is.  Its an effective and easy card form.

Friday, 29 September 2017

HAPPY BIRTHDAY

THERE'S A PEAR ON THERE!
I like to think that this card looks a lot better  in reality.  I end up taking most of the photos for this blog under flourescent lighting which is less than ideal.

This is particularly the case with "shiny things" (as will be featured in Regal's next demo).  The background paper )with gloss features) and foiled greeting bothe come from a Kaiser 6x6 pad, whilst the gold backing circle has geen embossed.

The pear and leaves have all been die-cut from gold paper using the Golden Pear Cluster from Kaiser (and available at Regal). Everything is put together on a Regal base-card - LR50 - which is a three panelled texured white card with a rectangular cut-out featuring a gold-foiled border.

Friday, 22 September 2017

TWO STENCILLED CARDS

STENCILLED AND STAMPED BUTTERFLY CARDS
Stencilling is very much the "in" thing at the moment, and Lee has used a stencil from Fabscraps to make these elegant cards.

On the pink one she has used two different Distress Inks to produce an ombre effect.  The background has been overstamped with a butterfly from a Kaiser stamp and die set, using black Versafine ink.  Subtle accent dots were made with Nuvo Drops, although you could also use Liquid Pearls.

The lavender card only uses one colour of Distress Ink, with the graduated colour effect being produced by using different amounts of ink and pressure through the stencil.  Both greetings are from Darkroom Door's "Simple Sayings" set.

Both these cards are of a simple, but very effective design.  If you haven't tried stencilling before perhaps this is the inspiration you need.  Regal Craft has a large range in store, as well as a huge selection of base cards

Friday, 15 September 2017

5 MINUTE BIRTHDAY CARD

This five minute marvel is a Lois/Heather joint effort (two and a half minutes each?)

Sometimes time is of the essence but you still want to give a handmade card so assemble some pretty paper, a greeting sticker a pretty picture and a bow.  Arrange it all on a base card from Regal Craft cards and away you go!

Friday, 8 September 2017

THANK YOU CARD USING QUATREFOIL LAYERED DIES

CLOSE-UP OF LAYERED DIES
QUATREFOIL LAYERED DIE
Lee has used two quatrefoil dies from Paper Roses (and available from Regal Craft Cards) to make this elegant "thank you" card.  The white on white detail is not shown to best advantage in the photograph, but you can see from the additional die cuts in white (layer 1) and gold (layer 2) how one die fits on top of the other for a layered/textured effect.  Of course each can be used separately and thus they are very versatile.

The flowers are layered too!  Kaisercraft's "Thank You" die and stamp set, come with both solid and outline stamps to save having to colour the image plus the die so you don't even have to worry about fussy cutting!  Even the greeting has a matching die.

Friday, 1 September 2017

ANOTHER CARD FEATURING A POSTCARD - SUITABLE FOR FATHER'S DAY

CHEERFUL SAILOR CARD
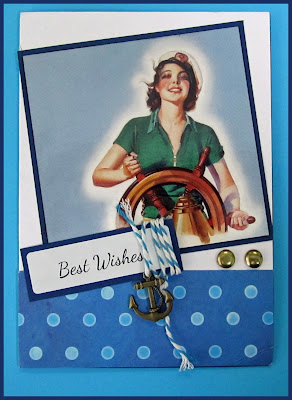
This cheerful card was made by Marilyn using a postcard available from Regal Craft, placed on a white single fold card, decorated with patterned paper.

She has trimmed the picture, and matted it on a dark blue border, and added a similarly matted sticker (once again from Regal).

Marilyn has embellished the card with an anchor charn "tied" with twine to the greeting, and added a couple of split pins to finish.

Father's Day might be on Sunday, but you'll still have time to finish this card if you start right now!  Otherwise its a good one to have in the cupboard as its suitable for both sexes and all sorts of occasions!

Friday, 25 August 2017

VELLUM PEEK-A-BOO CARD

VELLUM PEEK-A-BOO CARD

INSIDE THE CARD
We're having a bit of a "masculine" card-fest at the moment, and here's another.

A piece of decorative paper is stuck to the front of a singlefold white Regal Craft card, and a sticker is placed on top (I've used a
Sparklelight sticker from Regal SLS2009).

Cut vellum large enough to wrap around the card (i.e. the same height as the unfolded card, and every so slightly wider) and fold it in half.

Slip it over the card and mark (in soft pencil) the corders of the sticker, then remove, and either use a punch upside down or tape on a square die to cut out a window in the vellum.  (You can also use a craft knife).  Put a small piece of double sided tape just over the fold on the back of the white card, and carefully place the vellum over the top.  (You might want to do a test run first to make sure the window is in the right place).

Double sided tape can be seen through the vellum so you can either put it on carefully and leave it "as is" or add a border sticker or strip of paper over the top.  (If it really worries you, you can always sew the two layers together - three or 5 holes and some decorative thread are probably best as vellum tends to perforate with sewing machined lines)

Add a charm and greeting on the outside, and a different sticker and a paper border (matching the front of the card) to the inside and you're done.

In reality the patterned paper can be seen more clearly under the vellum on the front of the card, and the contrast between the shine of the sticker and the matte finish of the overlay is quite pronounced

Friday, 18 August 2017

3D PICTURE USING POSTCARDS

CARD FRONT

INSIDE THE CARD
Here's another card suitable for anyone really but probably timely with Fathers day just around the corner.  (You have no idea how long that paragraph took to complete as in the US, the apostrophe goes between the r and s, whereas in the UK it goes after the s, and in Tasmania I'm just confused.
I wimped out and didn't add one at all so put it where you want!)

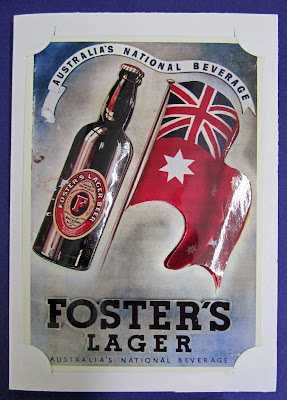
Anyway, back to the card - Regal has a spectacular range of vintage postcards.  I've used one as the base and cut and shaped (just using my fingers and the palm of my hand) elements from another couple to stick on top with foam tape.

The 3d effect is much more pronounced in reality that it appears on screen - the bottle is nicely rounded, and the flag does look a bit fluttery.  This post is turning into a bit of a repository of random information, but just in case you are thinking "but the flag should be blue"............The red ensign was in use from 1901 to 1954 and was the civil flag i.e.blue was for government and red was used if you wanted to fly an Australian flag in your backyard.  Needless to say everyone got very confused and the red flag is now only used at sea.

Getting back to the card (again) I've made a simple pop up machanism for inside, and used a Regal photo slot card as an easy way to mount the postcard on the front.

Friday, 11 August 2017

A CALENDAR FOR DAD

FATHER'S DAY CALENDAR
Here's an idea for a father's day card that will last for over a year.
(You can, of course adapt it for any occasion).

Just start with a centre stepper card (STE1), decorate it with co ordinating papers (these were from the small pad in the Kaiser High Tide collection) and add a 2018 calendar and you're done!  All these things are currently available from Regal Craft Cards, including the double-sided tape to stick it all together!

TIP - when you're fussy cutting around objects with fine detail, such as the wheel, leave a small border - it saves having to deal with all the little inny-outy bits and looks good too!

FRIDAY UPDATE

New dies and papers in at Regal Craft cards this week.  There are limited quantities so don't miss out!  Also, don't forget that on Thursday 17th of August (that's next week for folks reading this in real time) there will be a special 20% day off in the shop - a great chance to stock up on blank cards etc in time for Christmas card making, or to build up your collections of papers and stamps. Oh yes, I nearly forgot 50 packs of Kraft singlefold cards with envelopes are on special until they are replaced with something else on Monday - just $12.00 a pack if you come in today or Saturday!

Friday, 4 August 2017

CARDS FEAT. BBQ AND PICNIC TABLE DIES

Well, here's something a little bit different...............Its a bit on the cold side to be contemplating barbies and sun umbrellas, but it doesn't stop me dreaming...............

I've used a couple of bases from Regal Craft Cards as well as a couple of Paper Roses dies (purchased from Regal as well) to make some very straightforward cards.  Basically I've just cut out the shapes in a few colours and re assembled the pieces, added a greeting stamp and, in the case of the BBQ a triangular background, and that's it.

These dies are different to most of the other ones that are out there, and they can be used for a number of different occasions, plus they're great for the "blokey" cards that a lot of crafters seem to find difficult.  What I really love though, is that the shapes can be used in so many other ways.  Look at the umbrella for instance, turn it upside down and cut it in woodgrain as a fruit bowl, add some chain border stickers for a hanging basket, turn it on the side for fairy or butterfly wings, or add a head and legs for a tortoise etc etc etc.  I've lots of other ideas for all the other bits in both die sets, but would ruin your fun if I listed them all......what do you see when you look at the parts separately?

SUMMER CARDS 

Friday, 28 July 2017

TWO ROMANTIC COLLAGE CARDS

Janet has made two lovely cards to demonstrate how using decorative papers as inspiration can work wonderfully well when designing your cards.  In the first card, for example, she has used pink and yellow paper roses to decorate a framed element, echoing the colour of the blooms in the background paper.

A green and cream/gold theme has linked the elements of the second card.  It may not be evident from the picture, but some of the connections are quite subtle but still work to tie the components together - green chalk inked edges, small amounts of glitter in both background and toppers, mesh ribbon behind the birdcage echoing the shabby chic appearance of the script in the paper etc.  This card is on the wall in Regal, if you'd like to see the real thing.

Although both cards would be suitable for many occasions including birthdays. anniversary, engagement or wedding, mother's day and more, you could also use them as a very special correspondence card to send a "snail mail" hello to a person who is important to you.

ROMANTIC CARDS


Friday, 21 July 2017

PRETTY FLORAL CARD

PRETTY STAMPED FLOWERS
Tania has featured a stamp from Paper Roses on her pretty floral card.

The image is has been heat embossed in black, and coloured with blended pencils.  By using colours more or less opposite on the colour wheel, Tania has made the image almost leap of the page.

A selection of greet decorative papers, a plain green backing and a die-cut bow complete the picture, with inked edges helping to blend the layers.

A single fold Regal card has been used as the base.

Friday, 14 July 2017

QUICK ALL-PURPOSE HORIZONTAL CARD

QUICK CARD
Sharon has made this quick card using papers from FabScraps, some stickers and flower embellishments.

You can adapt the idea to suite the materials you have at hand.

Start with a singlefold base card from Regal Craft Cards (available in over 30 colours), and use it in horizontal profile as a base.

All you need to do then is add "stripes" of co ordinating plain and/or patterned papers, and some (optional) stickers to disguise the joins, and you're done.  You can of course add embellishments such as the flowers and rhinestones used here (or small stamps, diecuts, pearls etc) and a greeting.  Sharon has used a ration of 1/3 at the base to 2/3 above which works well visually.

If you save your scraps in colour-matched snaplock bags you're good to go and this can be a 5 minute card for any occasion.

Friday, 7 July 2017

HAPPY BIRTHDAY "EXPLORE" CARD


HAPPY BIRTHDAY - HORIZONTAL BAR FOLD
Apologies in advance because this photo doesn't really do justice to this lovely card.

Janet has used a modified horizontal fold card and papers from the Kaiser 61/2" High Tide paper pad to make this card.

It would be suitable for anyone, but would be a good option for people searching for new ideas for "men's cards".

An anchor charm has been tied around the bar at the front, tied on with natural twine.  Janet has inked some edges and handrawn a border around others, with brown/sepia ink, which blends in beautifully with the blue/brown colour theme

Friday, 30 June 2017

STAMPED LEAVES AND GRASSES CARD

OFFSET STAMPING
Hmmm.....must have been leaning to the side when I made this one!  Anyway, I'm sure you can see how its supposed to be, and make a far better version yourself!

There are a couple of stamping techniques you might want to try (or use again) worth mentioning.  The first is using a small to medium sized stamp to create a backing paper.  I used a leaf stamp with black ink to mirror the stamping in this case, but you can use Versamark if you want a more subtle effect, or mix and match colours if you prefer brighter!

The main image has been stamped twice - once with green and once, slightly offset with black.  If I was re-doing the card I would search out a more olive green, as the lime doesn't quite go with the backing paper, I'd probably use dark grey instead of black and I'd be positioning the stamps a little closer together.
Anyway, as I said, hopefully this effort will inspire you to seek out some stamps and have a go yourself and make a better card!  If you do, I'd love to see it!

I have, of course, used Regal products throughout.


Friday, 23 June 2017

IRREGULAR SINGLE FOLD CARD

THANKYOU CARD
Cards don't have to be rectangular, in fact why not have some fun, as has been done in this example and experiment with some different cuts.  As long as you remember to leave enough on the fold to keep the front and back attached, and a big enough base to support the card, the possibilities are endless!.

The maker has combined some pretty backing papers with elements from a Sparklelight 3D sheet.  She has added a peel-off greeting and some ribbon trim.  This is a fun card for someone special.

(Can you tell from the vague references to "the maker" that I'm not sure who actually produced this masterpiece.  Marilyn says "not her" , I know "not me" so apologies to Janet, Tania or Sharon for the lack of credit).

Friday, 16 June 2017

PATTERNED (DOUBLE) STAMPING WITH DIECUT FOAM

DOUBLE STAMPING
There is space underneath the main motif to add whatever greeting you want to this card - birthday. best wishes, "just a note" etc.  but the main point of it, as far as the blog goes, is to illustrate a couple of useful stamping techniques.

The large shape was cut from a foam sheet (which you can buy from Regal craft cards) using a nesting die and secured to an acrylic block with a little bit of double sided tape so that it could be used as a stamp.

You can just stamp in the ordinary way, in which case the result is a solid image of the diecut, but in this instance, for the bottom layer, the flower was inked up, and then an uninked (Darkroom Door) background stamp was pressed onto it. Instead of stamping the leaf pattern, it removed the pink ink from the diecut, which was then stamped onto the white background circle - patterned stamping!

The image of the inked diecut remains on the background stamp, so if you work quickly you can stamp a "negative" patterned image too!

I've made it sound a lot more complicated than it is.  You can use any solid stamp coupled with a relatively densely patterned one.  This technique appears under many different headings - often Kiss-stamping if you want to search for more info.

The base card is one of Regal Craft Cards newer cards -  Stonewash (PL27), which despite its name is a very on-trend shade of grey.

Friday, 9 June 2017

COLOURED CHALKBOARD EFFECT WITH STAMPS

WHITE STAMPING WITH PENCILS
I've used a blue cardbase from Regal Craft Cards, nesting dies and a stamp from Kaiser to make this card which illustrates a simple technique you might like to try next time you want to stamp on a dark background.

Select a fairly solid stamp, and stamp the image using white ink.  When the ink has dried (if you want to be sure, just whizz over it with a craft heat gun for a few seconds), colour on top with coloured pencils.

As you can see - super simple, but quite effective.  You end up with a gentle chalk-boardy effect.

I deliberately haven't added a greeting as you could use this card for many occasions.

Friday, 2 June 2017

BIRTHDAY/FATHER'S DAY CARD

BIRTHDAY CARD 
We are always being asked for card ideas that are suitable for men's birthdays and so Tania has used her dies and some papers from one of Kaiser's little pads to make this example.

There's no reason not to add a little bit of bling, though, and some well-placed green rhinestones add life and lift the neutral brown tones of the papers.

If you are already thinking about Father's Day cards, it would be a simple matter to replace the birthday greeting with a "Happy Father's Day" and keep the rest of the design.

Friday, 26 May 2017

STAMPING WITH VERSAMARK AND EYESHADOW

This isn't quite a 5 minute card but it won't take you very long to make.

Start with Regal's Wisteria card with a large oval aperture (LO16), and add a little thank you sticker to the bottom.

Stamp some flowers (I used Darkroom Door stamps) with Versamark ink.  Whilst the ink is still damp, rub on some chalks (true confessions - I used eyeshadows) to add colour.

Fussy cut around the edge of the largest flower (or as appropriate if you have positioned yours differently and slide over the edge of the oval when you secure the stamped paper in the card.  Stick the third panel closed and that's it.  Couldn't be easier!!

Friday, 19 May 2017

AUSTRALIANA BIRTHDAY CARD

AUSTRALIAN THEMED Z FOLD BIRTHDAY CARD
Roma has made this amazing Z fold card by adding folds and an extra panel to a single fold base card.

She has used a selection of carefully matted plain and patterned papers and various die cut and clip art shapes as decoration.

The difference between a good card and a great card is often in the detail and if you look at how carefully Roma has positioned her borders and how nicely she has coloured the die-cut animals, you can see why this falls into the latter category.

Friday, 12 May 2017

SPARKLELIGHT CELEBRATION CARDS

CELEBRATION CARDS
Sometimes we just want to say "well done" be it for passing exams or a driving test or just achieving something of note.

Lois has used a Sparklelight 3D sheet to make these bright and cheerful cards to send a message of congratulation.

The pack (Regal code - SLDK48634 contains two sheets.  One has greetings and two pictures to build up (more if you use the parts carefullly), the other has two different backing sheets, borders, corners and extra pictures.

Add in some Regal singlefold cards and you'll have enough cards to say "well done!" for quite a while!

Friday, 5 May 2017

CARDS USING STENCILS AND DISTRESS INKS

STENCILLED BUTTERFLY CARD
Stencils are all the go at the moment.  There are lots of different designs available at Regal right now and so many different ways to use them.

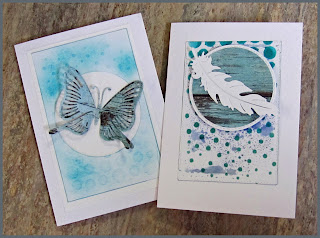
Lee has made the butterfly card at the top, using a distress ink background, with flicked water features and added a die cut greeting.

I've done something very similar for the feather card, only I've stamped on a more sparsely coloured distress ink background using a misted acrylic stamping block, before stencilling on the spots.

The third card has used the same stencil through the Cuttlebug (any similar machine will work), using a rubber mat to emboss the light card.  (I cut the circle in the middle out first).  I then just lightly rubbed some ink over the top to emphasize the texture.

All three cards feature die cuts.  The big butterfly is layered for a 3d effect.  Lee had added a glitter tape border to the edge of her panel, and I've inked mine to make it stand out a little more from the background.
TWO MORE EXAMPLES OF STENCILLED BACKGROUNDS

Friday, 28 April 2017

SPOOL CARD WITH RIBBON

SPOOL CARD FRONT
People are often under the impression that shaped cards are really difficult, and some of them are - not this one though!

All I've done is take a standard  Regal single fold card, and covered the middle of the front with some striped paper and the top and bottom with tan Bazzill.  The next step (with the card closed) is to pencil in some straight lines the same distance in from either side.  I've then used that ever useful papercrafting tool, a 20c piece to round the edges.  The actual measurements don't matter too much, you're only aiming at a cotton reely kind of shape with enough card still attached at the fold to hold it all together and a space big enough in the middle to hold the ribbon or trim you want to include.  Just make sure its symmetrical.

If you do your cutting (still with the card folded). just inside the pencil lines, you won't even have to rub them out.  You can add an optional hole in the middle at the top if you want to.

The next step depends on whether or not you want to include a small gift.  If not, and you used sideways stripy paper in the middle of the front, you're more or less done.  If you'd like to give some ribbons, laces or other trims to a crafty friend (or someone little who likes ribbons in their hair), secure one end at the base, and then carefully wrap the trim around the front of the card.  Secure with a pearl-headed pin (you might want to add a little dab of glue to the end if the sharp end might be a problem.  I've added a little spool tag.

Decorate the inside too if you want.
SPOOL CARD INSIDE

Friday, 21 April 2017

3d BUTTERFLY CARD

3D STAMPED BUTTERFLY
I like to think that this card looks better in reality than on screen, however, its more the technique, I wanted to show.

If you'd like to add a bit of dimension to your card you use the same method as I have shown here, which is.........

Stamp an image (from Kaiser) three times  - once onto the card front and the other two onto medium weight paper.
The image on the card is the background.  Decide which parts you want to use as the middle - (I've used the wings but not the body) and the front (Just the top two wings in this case.

Colour all the pieces (I've used Copics - you don't have to shade!), gently shape the cut out pieces so that they have a soft curve, and assemble them on top of each other, using foam dots to add height.  That's it - I hope I haven't made it sound harder than it is.

I've added a stamped greeting, also attached with foam dots, and edged the card (a single fold from Regal of course) and greeting with a little sepia ink.

Thursday, 13 April 2017

PAPER ROSES STAMP BON VOYAGE CARD

BON VOYAGE
Sometimes "less is more" and this card has a very simple colour scheme - just blue and white.  The sailor boy stamp is one of the lovely new cling rubber stamps made by Paper Roses, and the "Bon Voyage" is from a Kaiser set.  I've used Versafine ink so that all the tiny textured detail on the jacket etc comes out clearly.

I've subtitled this my "Nervous Stampers Card" because each of the elements is done separately and then assembled.  The boy is stamped onto smooth white card and then placed in a textured white rectangle cut out card from Regal Craft Cards. The greeting has been stamped onto smooth card, fussy cut and attached to the front with foam tape to raise it slightly off the surface.  There is an insert fixed inside with double sided tape that has an additional greeting.  In other words you don't have to commit anything to the overall card until you're happy with the result....................Not that this should be a problem as I have found that all the Paper Roses stamps I have used have stamped a perfect image first time!

For everyone who is enjoying a break over the next few days, may it be happy and fun, and for those of you still working, thankyou - obviously you are doing something very worthwhile and your efforts are appreciated!  Best Wishes to all.

Friday, 7 April 2017

COFFEE MUG CARD

5 MINUTE CHAI CARD
This is a genuine 5 minute card.  Grab a tea bag (the sort that come in the larger packets like Twinings), a pre-cut coffee mug card (XNO46) from Regal craft cards and some paper to stick over the peripheral bits of the mug.  Stick it all together and cover the messy bits by securing the third panel over the top and off you go!

You can obviously add a lot more embellishment than I have used, and if you want to make the card more decorative than functional, you can always take the tea bag out of the packaging first, and enjoy it yourself.

This would make a nice "getting in touch" card for someone you can't actually meet for a cuppa, and/or you could have some fun choosing the appropriate type of tea to send.  This one is both "spicy" and "soothing"...no further comment.


Friday, 31 March 2017

BIRTHDAY CARD AND POST-IT HOLDER

CARD WITH MATCHING POST-IT HOLDER
Sometimes its nice to give a little gift with a card.  This example comes from one of the demos I did last year.  The card part is super simple - I've just used a pretty piece of Graphic45 paper and added a die-cut oval with coloured peel-off greeting, as the wording on the paper in the middle of the frame didn't suit the occasion.  The base is a textured ivory single fold frim Regal.

I can't give you precise instructions for the post-it folder as I just placed the post-its on a scrap piece of card and drew roughly around it, adding a flap on either side of the base and at the bottom, then neatened it up and checked that it all fitted together before using it as a template on my "nice" card.  I'm sure more formal templates for something similar are available on-line.

More G45 paper has been used to decorate the top flap, as well as a fabric flower and some little pearls.  Acutually I've just noticed that one is missing from the top rh edge already, which tends to suggest that using them for something that may well be tossed around in your handbag might not be a good idea.  Perhaps liquid pearls or similar would be better.

Probably the thing most noteable, is the closure mechanism which is just two pieces of sticky-backed magnet sheet (available from Regal).  Its easy to cut with scissors, you don't need glue, and it provides a surprisingly firm closure.  There's enough room at the top of the post-its to add a little pencil (save time looking for the right size by just sawing a big one to size).  You might want to tie it on just to make sure it doesn't go its own way.

With a different greeting this set would do for Mother's day or Secret Santa as well as birthdays.

FRIDAY UPDATE

It was lovely to see so many smiling faces at the free demo last week - some new and some familiar!  I hope everyone who came left with some useful ideas.  The next big date on the calendar for Regal Craft Cards is their giant sale on June 23rd.  I'll give you more details about that closer to the time.

The new Kaiser range will be available - there are two collections which include papers, dies, pads, collectables etc.  One is a pinkish vintage - "High Tea" and the other (which is my favourite) "Indigo Skies" is my favourit e colour combo - navy blue and white!  There are some other new dies in the shop - pop by and have a look!

Friday, 17 March 2017

COOKING THEMED BIRTHDAY CARD

HAPPY BIRTHDAY FOR COOKS
Cooking is a popular pastime at the moment for all sorts of age groups and both men and women, so I've tried to think of a card that would be broadly suitable for anyone.

The colour choice is about a neutral as it gets - black, white and silver (TIP - if you're having a bad colour day choose b&w plus one colour or a metallic and you can't go wrong).

I've rummaged around my ever-expanding box of Kaiser dies and cut out squares, ovals, cooking utensils and the greeting and then just assembled it on a silver background and stuck it to a white Regal single fold card.  If you don't have all the dies, you can always substitute stickers or stamps for the greeting, and fussy cut pictures or stamped images for the utensils (or other cooking related items).  The silver I have used is mirror board and consequently, is very shiny (not so evident in the photo).

If you like to theme your cards around gifts, cookbooks, aprons, actual utensils, and exotic ingredients are obvious accompaniments.