This isn't quite a 5 minute card but it won't take you very long to make.
Start with Regal's Wisteria card with a large oval aperture (LO16), and add a little thank you sticker to the bottom.
Stamp some flowers (I used Darkroom Door stamps) with Versamark ink. Whilst the ink is still damp, rub on some chalks (true confessions - I used eyeshadows) to add colour.
Fussy cut around the edge of the largest flower (or as appropriate if you have positioned yours differently and slide over the edge of the oval when you secure the stamped paper in the card. Stick the third panel closed and that's it. Couldn't be easier!!
This is the place for handmade cards! I'll be posting a new project every week so keep checking back for new craft card ideas.
Friday, 26 May 2017
Friday, 19 May 2017
AUSTRALIANA BIRTHDAY CARD
 |
| AUSTRALIAN THEMED Z FOLD BIRTHDAY CARD |
She has used a selection of carefully matted plain and patterned papers and various die cut and clip art shapes as decoration.
The difference between a good card and a great card is often in the detail and if you look at how carefully Roma has positioned her borders and how nicely she has coloured the die-cut animals, you can see why this falls into the latter category.
Labels:
Birthday,
Die-cutting.,
Masculine
Friday, 12 May 2017
SPARKLELIGHT CELEBRATION CARDS
 |
| CELEBRATION CARDS |
Lois has used a Sparklelight 3D sheet to make these bright and cheerful cards to send a message of congratulation.
The pack (Regal code - SLDK48634 contains two sheets. One has greetings and two pictures to build up (more if you use the parts carefullly), the other has two different backing sheets, borders, corners and extra pictures.
Add in some Regal singlefold cards and you'll have enough cards to say "well done!" for quite a while!
Labels:
3Ds,
congratulations,
Sparklelight,
well done
Location:
Launceston TAS 7250, Australia
Friday, 5 May 2017
CARDS USING STENCILS AND DISTRESS INKS
 |
| STENCILLED BUTTERFLY CARD |
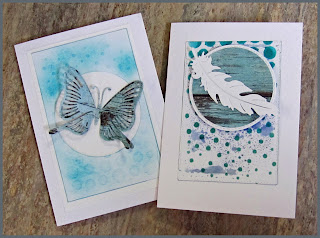
Lee has made the butterfly card at the top, using a distress ink background, with flicked water features and added a die cut greeting.
I've done something very similar for the feather card, only I've stamped on a more sparsely coloured distress ink background using a misted acrylic stamping block, before stencilling on the spots.
The third card has used the same stencil through the Cuttlebug (any similar machine will work), using a rubber mat to emboss the light card. (I cut the circle in the middle out first). I then just lightly rubbed some ink over the top to emphasize the texture.
All three cards feature die cuts. The big butterfly is layered for a 3d effect. Lee had added a glitter tape border to the edge of her panel, and I've inked mine to make it stand out a little more from the background.
 |
| TWO MORE EXAMPLES OF STENCILLED BACKGROUNDS |
Labels:
Best Wishes,
Die-cutting,
Distress ink,
Embossing,
Stencils
Location:
Launceston TAS 7250, Australia
Subscribe to:
Comments (Atom)
